Diamond Rock Spring Water bottles and water coolers both require periodic cleaning/sanitizing. It is important to know that bottled water can last for very long periods of time without effecting the quality and taste of the water. However you should rotate your bottles using the oldest bottles first. Also, it is very important not to store extra bottles in direct sunlight. Direct sunlight can adversely affect bottled water by promoting algae growth over a period of time.
Diamond Rock Spring Water recommends the following documentation for properly maintaining your water cooler.
A:
 Whenever your cooler leaks, 99 times out of 100 it is due to a defective bottle! The water bottle is the problem…it has a tiny fracture or pin hole in the bottle.
Once the bottle is placed on the cooler the water level drops and cannot hold the vacuum which keeps the water in the bottle.
A good analogy for this is when you open a Hi-C can and nothing comes out, because there is a vacuum. So what you do is puncture another hole in the can to releases the vacuum and then the juice flows quite rapidly.
This problem normally occurs in older bottles that have been through many cycles of cleaning and sanitizing. Be aware that this could also happen in a new bottle that has been roughly handled or dropped by mistake!
To test whether your cooler is the problem or whether it is your bottle, your first step is to remove the bottle. Let whatever water that’s in the reservoir sit in the cooler. After half an hour, check the cooler reservoir. If the reservoir is full or at the same level then you definitely know that the leak was due to a faulty bottle.
After you have discovered a broken bottle please take a marker and label the bottle ‘broken’, ‘cracked’, or ‘leaker’. This will ensure that the bottle will be taken out of rotation and will prevent a future leak. Diamond Rock Spring Water will recycle that bottle or if you want you can keep the bottle for yourself and use it for a ‘piggy bank’!
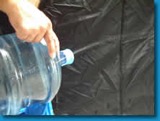
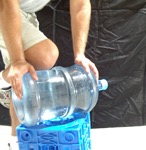
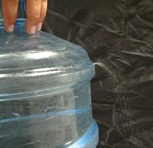
The best way to prevent a leaking bottle on your cooler is to test each bottle before hand. Below is a picture of a simple test that you can do at home!
A: 99% of the time when there is no water coming out of your cooler it is because the water has frozen inside the reservoir, causing ice to form.
Q: Why is my cooler freezing up?
A: There are several reasons for your cooler to freeze. The main reason is because your cold thermostat is over working. The thermostat is not shutting off. Reservoir freeze-up is due to improper ventilation. The standard water cooler uses a static type condenser, this means there is no fan motor to release the heat from the machine. Therefore the cooler must have adequate ventilation to disperse the heat generated by the refrigeration system.
A good example of this is when a cooler is installed with little or no back or side clearance. The heat generated by the machine stays trapped inside the cooler where the motor is. This heat causes the cold control to increase its ‘on-time’, causing freezing.
Be aware also that any drastic changes in the weather’s temperature can cause the thermostat to over work. Diamond Rock Spring Water receives many service calls that first week of summer-like hot weather.
The other reason for your cooler to freeze up is very simple. The thermostat in the cooler is set too high!
Another reason for no water flow is due to a faulty faucet. Most likely the inside of the spigot is broken. To test the faucet all you need to do is untighten the cap of the spigot and lift up spigot. If water starts coming out quickly tighten cap back onto faucet. If no water flows then you know the reservoir is frozen and you should follow the upcoming steps.
Q: OK, So What Should I do?
A: The first step you should take is unplugging the cooler and let the ice inside the reservoir defrost. Give it at least 6 hours to thaw. Then you should move your cooler at least 3 inches from the back or side of the wall. Next plug the cooler back in. If the problem persists the next thing you should do is turn down the thermostat on the back of the cooler. Please
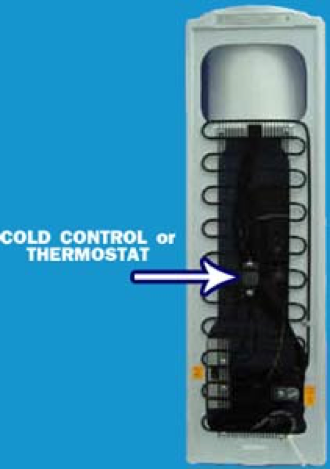
Follow the diagram below.
 Step #1 – Unplug the Cooler
Step #2 – Turn cooler around so the back of the cooler is facing you.
Step #3 – Locate the Cold Control. The cold control on most water coolers is located half way down the middle of the cooler. Once you locate the cold control, the next step is to locate the actual thermostat. The Thermostat is in the center of the cold control and looks like a flat head screw! To lower the temperature turn the little screw 1/8th” counterclockwise. To increase the temperature (make colder) turn the screw 1/8th” clockwise.
Warning! – Do Not Turn screw more than 1/8th” clockwise…the thermostat is very sensitive and will freeze if over adjusted!!!!
A: If water is dripping from the faucet, it is due to either normal ‘wear and tear’ or due to the cap of the faucet not being screwed on tight enough.
To solve the dripping, first try to tighten the cap of the faucet. Remember righty tighty…lefty loosey! If the dripping persists it is due to the rubber stopper in the faucet itself. At this point you should call Diamond Rock Spring Water and we will send you a new faucet.

Special Instructions For Hot & Cold Units
Do not allow sanitizing solution to enter hot tank! You must plug up the hot tank hole with plumbers putty (found at your local hardware store) before cleaning proceeds.
Cleaning Instructions:
1. Remove empty bottle
2. Unplug the cooler from the wall.
3. Drain out any water left in the reservoir
4. Let cooler stand for a few minutes to allow any ice in the reservoir to melt.
5. Fill reservoir 3/4 full of clean water and add 1/2 tablespoon of liquid Clorox bleach in water.
DO NOT USE STRONGER SANITIZING SOLUTION
6. Allow water to stand for 5 minutes
7. Important. Drain water and sanitizing solution out of tank…through the cold spigot only.
8. Flush thoroughly!!! Fill and empty through spigot no less than 6,7 times.
9. If you experience a taste problem, place 1 tea spoon of baking soda into reservoir and add water. Allow to sit for 5 minutes and repeat flushing instructions.